Proper mounting, wiring, and clearance prevent most microwave installation problems.
I’ve installed dozens of microwaves in homes and remodels. This guide on microwave install tips? draws on hands-on experience, code basics, and troubleshooting wins and failures. Read on for clear steps, safety checks, and tips that save time and keep your kitchen safe.

Tools and prep you’ll need
Before you start, gather tools and parts. This saves trips and cuts mistakes.
- Adjustable wrench, drill, and stud finder.
- Tape measure and level.
- Wire stripper, voltage tester, and screwdrivers.
- Mounting bracket (if needed) and installation hardware that came with the microwave.
- Helper to lift and steady the unit.
Measure the cabinet or wall opening carefully. Check the microwave manual for the exact cut-out size and clearance rules. When I skipped measuring once, I had to re-cut cabinets and it cost time and money. Always measure twice, install once.

Safety and local codes to follow
Safety comes first. Local codes vary, so check them before you begin.
- Verify circuit amperage and breaker type for the microwave.
- Confirm venting rules for exterior exhaust versus recirculating options.
- Use a licensed electrician when you need new wiring or a dedicated circuit.
- Turn off power at the breaker before doing any electrical work.
I once patched a vent that did not go outside. The unit overheated and tripped breakers until we re-routed the duct properly. Following code and safety rules prevents those costly fixes.

Electrical and venting considerations
Power and venting are the two most common failure points during installs.
- Dedicated circuit requirements: Many over-the-range microwaves need a 15 or 20 amp circuit; check the manual.
- Hardwired vs plug-in: Some homes use a hardwired connection. If so, hire an electrician for a safe hook-up.
- Venting options: Exterior venting is best for grease and steam. Recirculating charcoal filters work but reduce performance.
- Duct size and length: Keep duct runs short and straight. Use rigid metal ducts when possible.
I always inspect the existing vent and wiring before mounting. A quick look saves hours of rework later.

Step-by-step installation guide
Follow these steps for a smooth install. Read the microwave manual first. Manuals often include model-specific notes you must follow.
-
Prepare the space
-
Check wall studs and cabinet floor for mounting support.
-
Mark the centerline and mounting hole locations per the template.
-
Install the bracket or mounting plate
-
Fasten the plate into studs. Use lag bolts for heavy units.
-
Confirm level and secure all fasteners.
-
Connect the electrical
-
If using a plug, ensure the outlet is accessible and grounded.
-
If hardwiring, make wiring connections with wire nuts and ground properly. Hire an electrician if unsure.
-
Lift and mount the microwave
-
With a helper, lift the microwave and hook it onto the bracket.
-
Secure lower screws into the cabinet floor or side panels to stabilize.
-
Finish vent and trim work
-
Attach ductwork to the vent collar and seal joints with foil tape.
-
Install any trim or filler pieces for a clean look.
-
Test operation
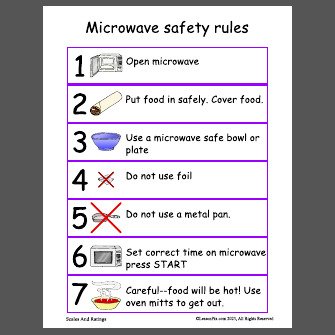
1. Power on and run a short test with a cup of water to confirm heating and vent fan operation. -
Check for unusual noises, vibrations, or burning smells.
I recommend practicing the lift and mount motion with a cardboard mock-up if the unit is heavy. That one rehearsal keeps the real install safe.

Built-in versus over-the-range options explained
Choose the right style for your kitchen layout and needs.
- Over-the-range microwaves save counter space and include integrated vents and lights.
- Built-in microwaves require a custom cabinet opening and often need trim kits.
- Consider door swing, clearance, and sightlines when choosing a model.
- Built-in units can look seamless but are harder to replace later.
When I helped a client choose between the two, we prioritized cabinet reuse. Over-the-range was faster and cost less, while built-in gave a sleeker look but higher labor costs.

Common mistakes and how to avoid them
Avoid these frequent errors during microwave installs.
- Skipping the manual: Model specifics matter for mounting height and venting.
- Bad measurements: A poorly cut opening turns a simple install into a remodel.
- Weak mounting: Not anchoring to studs risks a dropped microwave.
- Wrong circuit size: Using an undersized circuit causes nuisance trips.
I’ve fixed installs where the unit was only in drywall anchors. Anchor to studs or use proper reinforcement. That mistake can cause damage or injury.

Testing and maintenance after install
A few checks now save headaches later.
- Run a full test cycle with water to confirm heating.
- Test all fan speeds and lights.
- Inspect duct joints for leaks and seal with foil tape.
- Clean filters monthly if you use a recirculating setup.
I schedule a follow-up inspection 30 days after a remodel to catch anything that needs tightening or adjustment. Small fixes then prevent big problems later.
Troubleshooting common issues
If something goes wrong, try these quick fixes first.
- Microwave won’t power on: Verify breaker, outlet, and power cord connection.
- Fan runs but microwave won’t heat: Check door latches and ensure the unit is starting correctly.
- Excess vibration or noise: Confirm the unit is level and mounting screws are tight.
- Duct odors or smoke: Clean or replace charcoal filters and inspect duct for grease buildup.
I once resolved a noisy fan by simply tightening a loose lower mounting screw. Quick checks often solve the problem.
Frequently Asked Questions of microwave install tips?
How high should an over-the-range microwave be installed?
Most over-the-range microwaves should be 13 to 18 inches above the cooktop top, but check the manual and local codes. Height can vary with cooktop style and user comfort.
Do I need a dedicated circuit for a microwave?
Many microwaves need a dedicated 15 or 20 amp circuit. Check the appliance label and local electrical codes; when in doubt, hire an electrician.
Can I vent a microwave into the attic?
Exterior venting should exhaust outside, not into the attic, to avoid moisture and grease buildup that leads to mold and fire risk. Reroute ductwork to the exterior if possible.
Is it safe to hardwire a microwave myself?
Hardwiring involves electrical risk and code requirements. If you lack wiring experience, hire a licensed electrician to ensure safety and compliance.
What size duct should I use for venting?
Use the duct size recommended in the manual, typically 3-1/4" x 10" rectangular or 6" round for many models. Larger, straighter ducts improve airflow and reduce noise.
How often should I clean the microwave vent filter?
Metal grease filters should be cleaned every month in heavy use kitchens. Charcoal filters in recirculating setups need replacing every 6 to 12 months depending on use.
What if the microwave door doesn't close properly after install?
Check that the unit is level and that mounting screws are not causing distortion. If the problem persists, the latch or hinge may be misaligned and needs adjustment.
Can I install a microwave over an induction cooktop?
Yes, but pay close attention to clearance recommendations and heat shielding. Induction cooktops generate less ambient heat, but you must still follow the microwave manufacturer's spacing rules.
Why does my microwave trip the breaker when I use the fan?
The fan and light on some models run on the same circuit as the magnetron. If a breaker trips, there may be a shared load or an electrical fault; have an electrician inspect the circuit.
Should I test the microwave with a cup of water after install?
Yes. A cup of water run for a minute tests basic heating and confirms the unit works without loaded food. It’s a safe, quick functional check.
Conclusion
Follow clear steps, check codes, and use the right tools to make your microwave install smooth and safe. Use these microwave install tips? to plan, prepare, and test every install. Take action now: measure your space, read your manual, and hire pros for electrical or structural work. Share your install stories or questions below and subscribe for more practical home project guides.